About the author ...
Systems engineer for over 35 years in UNIX-based data centers (enterprise computing).
Qualified educations: 'IT systems technician' (technical) & 'data processing merchant' (economically)
UNIX experience since 1979 with lots of UNIX derivates in data centers and power-workstations in CAD areas: IBM [AIX], Hewlett-Packard [HP-UX], Sun Microsystems [SunOS/Solaris], Silicon Graphics [IRIX]. On INTEL based workstations: SCO Unix, Interactive Unix
Linux experience since 1993: Slackware, SuSE, RedHat, Debian/Ubuntu
Today I am using Fedora on a powerful HP Z620 workstation in the office. On 'root servers' CentOS (or other RHEL clone) is my Linux-of-Choice, since it is a 100% clone of RedHat Enterprise Linux (RHEL)
OpenVPN is a toolkit to easily establish SSL-based VPN connections between VPN servers and VPN client systems.
OpenVPN is available for:
- Linux
- Windows
- MacOS (Apple)
Availability:
| OS | Package source |
| Linux | Just install 'openVPN' from the particular distribution repository |
| Windows | https://openvpn.net/community-downloads-2/ |
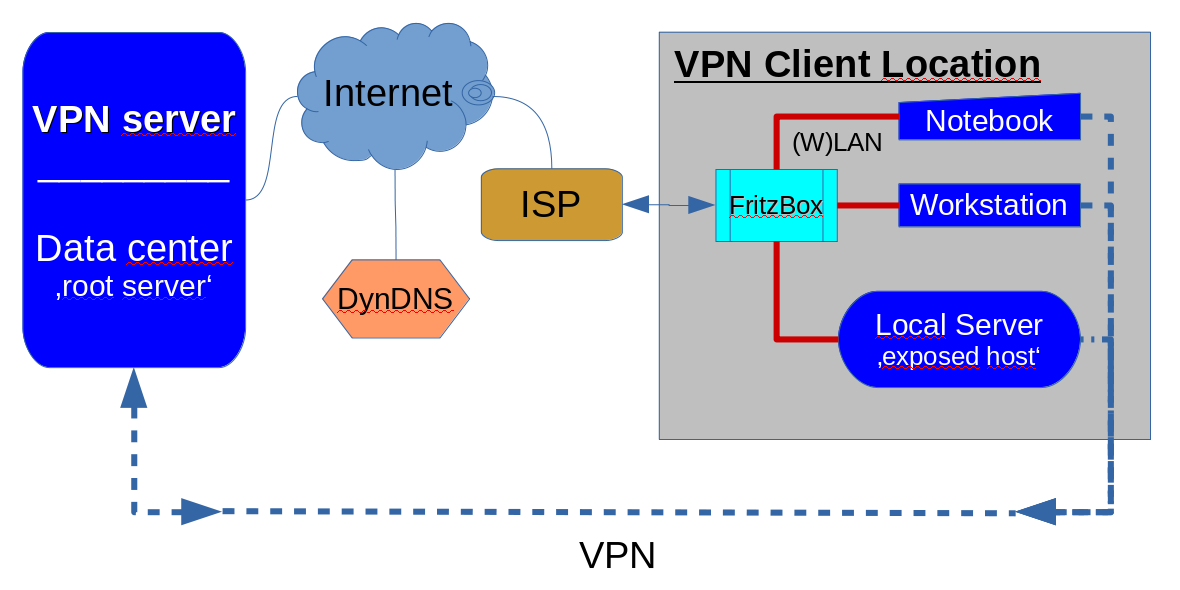
Here I provide a showcase and concept for a bunch of static (persistent) VPN tunnels between a rented 'root server' in a data center and several client systems spread across the country.
In this example:
- The server system is a Linux server system running a quite 'conservative' CentOS-7. (RHEL-7)
- The client can be anything for which an OpenVPN implementation is available. Namely: Linux, Windows & MacOS
Since I don't have Windows & MacOS clients at hand the client installation & configuration section only shows the procedures for Linux clients.
| Note: This is not a solution for an open/public VPN infrastructure. |
The scenario shown here is using static/persistent/dedicated VPN tunnels. The benefit from static (persistent/dedicated) VPN tunnels with openVPN is, that it does not need any PKI (Private Key Infrastructure). So the configuration is essentially easy since no PKI must be maintained to get things up and running.
In a static tunnel VPN tunnel environment the server has just to generate a 'static key' for the connection that must be transferred (copied with ssh, scp, or otherwise secure way) down to the client system to be integrated with the client setup - that's it.
The architecture of the explained scenario:
Step 1: Preparing and configuring the server ...
You must be 'superuser' (root) for the installation and configuration tasks to be conducted.
Install openvpn on the server and go to the management directory /etc/openvpn/...
OpenVPN is very versatile and provides measures for many 'scenarios'. So it is important to keep things clear for the purpose and the chosen scenario.
Conditions for this example
♦ The VPN network
First of all a decision must be made on which network to be used for the VPN. In this example, the choice is the '10.0.0.0/8' network, since it offers the most flexible use for the purpose.
For the purpose the address was structured as follows:
10.0.x.y
where:
- x ... is the tunnel number (theoretically enough for 256 static VPN tunnels)
- y ... is either '1' for the server or '2' for the client.
| Server | Client | |
| tunnel #1 | 10.0.1.1 | 10.0.1.2 |
| tunnel #2 | 10.0.2.1 | 10.0.2.2 |
| tunnel #3 | 10.0.3.1 | 10.0.3.2 |
| ...and so on ... |
Since a static tunnel is a point-to-point connection the netmask will be automatically set to "255.255.255.255" (/32) by openvpn when the connection is established.
♦ The Ports
The standard port for the openVPN service is '1194' which is left alone.
In the list of assigned service ports in /etc/services all ports 1194x .. 11966 are unused.
So in this example the port range 1194x (x=0...9) is used to assign a 'single digit' exclusive port number for each static tunnel to be created and running on an exclusive port for this static tunnel which is in fact a point-to-point connection.
The restriction to 'single digit' port IDs automatically sketches the nomenclature for tunnel configuration files:
- tunnel1.conf
- tunnel2.conf
- tunnel3.conf
- ...
- tunnel9.conf
(no 'tunnel0', since '0' is not really an ordinal number - just to keep things easy)
If this is not enough for you, you may have a look at /etc/services and it turns out, that in fact the entire port range from 11900...11966 is not used. So you may use a tunnel nomenclature with 2-digit tunnel numbers as follows:
| Tunnel name | Exclusive Port |
| tunnel00 | 11900 (reserved/excluded) |
| tunnel01 | 11901 |
| tunnel02 | 11902 |
| tunnel03 | 11903 |
| ... | |
| tunnel66 | 11966 |
This gets you a range of 66 static/persistent tunnels - and if you can ignore the assigned port from 11967..11999 you may even extend the range to 99 tunnels that are possible with 2-digit tunnel numbers.
In the sample concept, I stick to 1-digit tunnel numbers to keep things easy.
Modify your /etc/services file as shown below:
|
# Static VPN tunnels - starting from service port 11940 |
By providing these service numbers in /etc/services you get decent information in the output from network tools like 'route', 'ifconfig', 'lsof' etc.
Some entries in the servers /etc/hosts cannot hurt either ...
|
# We are ...
# Outerspace ... VPN clients |
Define static tunnels in /etc/openvpn/... on the server
Create definitions for the static tunnels in /etc/openvpn/... as you need them as follows:
[root@vmd28527 openvpn]# cat tunnel1.conf dev tun port 11941 ifconfig 10.0.1.1 10.0.1.2 secret static.key comp-lzo cipher AES-256-CBC keepalive 10 60 ping-timer-rem persist-tun persist-key daemon tunnel1 |
[root@vmd28527 openvpn]# cat tunnel2.conf dev tun port 11942 ifconfig 10.0.2.1 10.0.2.2 secret static2.key comp-lzo cipher AES-256-CBC keepalive 10 60 ping-timer-rem persist-tun persist-key daemon tunnel2 |
For more tunnelX.conf configuration files copy an existing tunnelX.conf
# cp tunnel1.conf tunnel3.conf
Then replace the red numbers inside the particular tunnel configuration file accordingly.
| Note |
|
All tunnel endpoints on the server and all clients share the same 'secret' in the 'static.key' file in this example. For production, you should consider generating a separate static key file for every tunnel to be established as 'staticX.key' where X is the tunnel number to which the key belongs on the server and on the client side for a particular static tunnel. See the documentation of openVPN to get into the topic: https://openvpn.net/community-resources/static-key-mini-howto/ |
Let the server firewall know ...
The instructions below are for 'iptables' on CentOS-7 configured in /etc/sysconfig/iptables. On other systems, the path for the 'iptables' start-up file may differ a little.
Add this to the '*nat' section (before the 'COMMIT') of the basic firewall configuration on your system:
|
If your 'outbound' network interface is other than 'eth0' change this as well.
Add this to the '*filter' section in the iptables basic configuration:
|
|
Establish a service start-up script (here: traditional SysV-style) in /etc/init.d with the name 'tunnel'. For instance:
#!/bin/sh### BEGIN INIT INFO |
Don't forget to make the 'tunnel' script in /etc/init.d/... 'executable':
# chmod +x tunnel
Note: the start-up script works for 'single digit' tunnel numbers, if more than 9 static tunnels are needed:
- the start-up script must be tweaked to handle 'multi-digit' tunnel numbers;
e.g. 'echo tunnel?.conf' __change to__ 'echo tunnel*.conf'
Also check your /etc/services & /etc/hosts files to match the extended nomenclature - the 'tunnelX' configuration files in /etc/openvpn must be moved to 'tunnelXY'; e.g.:
# mv tunnel1.conf tunnel01.conf
and so on for all tunnelX.conf files
With such a modification the use of additional 'tunnel10.conf' up to 'tunnel26.conf' or even 'tunnel99.conf' would be possible, if you decided to use the full range of port numbers starting from 11900.
Enable the service init script
To have the tunnels established on system start-up or reboot the service init script must be enabled finally:
Usually with a:
# chkconfig --add tunnel (on RHEL, CentOS; DEBIAN and/or SuSE may differ a little)
this will happen.
After running the service script (with 'service tunnel start' ... or ... '/etc/init.d/tunnel start') the tunnels configured in /etc/openvpn/... should line up in your network interface configuration:
# ifconfig
|
To check whether the UDP sockets are established you can check with the 'lsof' command:
|
With this step, the VPN server configuration is finished.
Step2: Configure the client location
Tweaking a 'FritzBox' or other (W)LAN router (client side)
Condition: You need to have a DynDNS configuration for the FritzBox/(W)LAN router. If you do not already have one, then get one from the various DynDNS providers on the Internet. Then configure DynDNS in your FritzBox/(W)LAN router.
At the moment you can 'ping' your FritzBox/(W)LAN router by the domain name that you have got from the DynDNS provider you may continue. Otherwise, it makes no sense at all.
.-.-.-.-.-.-.-.-.-.-.-.-.-.-.-.-.-.-.-.-.-.-.-.-.-.-.-.-.-.-.-.-.-.-.-.
Words of wisdom ... don't bang your head against 'FritzBox VPN' ... just open the ports in the FritzBox's firewalling to allow the relevant ports in the range 11940 ...11966 (max) to go through to assigned network endpoints in the FritzBox configuration.
With a workstation, a notebook, and a local office server in a client location that are all getting their private static VPN tunnel there should be 3 separate 'Port-Freigaben' under "Internet -> Freigaben"; let´s say for example the ports 11941, 11942 & 11943 are to be used in one location. You may configure these 3 "Freigaben" with the labels:
- VPN1: for port 11941
- VPN2: for Port 11942
- VPN3: for port 11943
inside your FritzBox/(W)LAN router.
Take care that port numbers in one location do not intercept with assigned port numbers in other locations to avoid any access conflicts on the server side! The connection labels in separate FritzBoxes may repeat across the VPN with static/persistent tunnels - but not the port numbers.
| Router label | Location A | Location B | Location C | Location D | ... | Location X |
| VPN1 | 11941 | 11944 | 11946 | 11947 | 11949 | |
| VPN2 | 11942 | 11945 | - | 11948 | - | |
| VPN3 | 11943 | - | - | - | - |
If everything is fine with your DynDNS setups and port assignments in the locations you may continue with the actual client setups.
Step 3: Preparing and configuring the client system
To install and configure the client you must be an administrator/superuser as well.
Download and install the OpenVPN package for your particular client system. On Linux systems, you can install 'openvpn' with 'dnf', 'yum', 'apt', etc. from the distribution repository.
The client setup is a lot easier than the setup for the server since only one 'tunnel.conf' is needed in the openvpn configuration directory.
I recommend creating a sub-directory below /etc/openvpn/... to keep the static client configuration:
# mkdir /etc/openvpn/client/static
# cd /etc/openvpn/client/static
Then create the configuration file for the client tunnel as 'tunnel.conf'.
Assumed is that tunnel #1 is used for this client setup in this example. On other clients, the port number must differ as well as the tunnel number part in the IP address.
| dev tun port 11941 remote <your SERVER domain name here> ifconfig 10.0.1.2 10.0.1.1 secret static.key cipher AES-256-CBC comp-lzo keepalive 10 60 ping-timer-rem persist-tun persist-key daemon tunnel1 |
Note, that the IP address of the client comes first in the ifconfig statement followed by the server's VPN IP address!
The last missing thing for setup is the key for the connection specified in the 'secret static.key' statement. In this example, it is assumed, that all clients share the same encryption key. So all clients can just copy the same 'static.key' file from the server in the server's /etc/openvpn directory.
To get things going just copy this key file into the directory where your 'tunnel.conf' file resides. You are currently superuser (root) for the installation task anyway. So you may copy the key file from the server with:
# scp root@<server name>:/etc/openvpn/static.key .
into the current directory. (/etc/openvpn/client/static)
Last but not least the client also needs a service startup script in order to connect with the VPN server automatically after system startup and reboot.
Drop the following code into a file in /etc/init.d as file name 'tunnel'
|
|
Make the script 'executable' and finally enable the service script to be executed at system startup & reboot:
# chmod +x tunnel
# chkconfig --add tunnel (on RHEL and clones like CentOS; Debian/Ubuntu & SuSE may differ)
Now everything is configured so that it can be started for a successful connection.
Just start the service script manually with 'service tunnel start' or '/etc/init.d/tunnel start' or just "./tunnel start" while sitting on /etc/init.d
Check with 'ifconfig' that the tunnel device has established:
|
[root@hphws init.d]# ifconfig tun0
|
If everything went fine so far now a 'ping' to the server (destination address) from the client side should succeed.
Login into the server and `ping'ing the client IP for this tunnel the client should respond to the ping from the server side as well.
Cosmetics for decent output from network tools (route, ifconfig, ...)
Like on the server, the client should have entries to:
- /etc/services
- /etc/hosts
/etc/services
vpnX 1194X/udp # Static VPN tunnel X |
where X is the tunnel number that the server provides for this static tunnel to this particular client.
To address the VPN server 'by name' kind of a DNS resolution should be configured. The simple/easy way
is by entries in the /etc/hosts file.
/etc/hosts
|
# Me ... # ... and my VPN server |
where X is the tunnel number that the server provides for this static tunnel to this particular client.
This way you may connect to the VPN server by simply using the configured name;
e.g. 'ping vpn'
This finishes the VPN client configuration
Some checking ...
|
Input --stream--> | Process | --stream--> Output In a unixoid system, every data flow is a 'stream'; i.e.: a 'file' - for a network connection called 'socket'. |
Checking on the server ...
[root@vmd28527 Watcher]# lsof | grep vpn | grep UDP
openvpn 882  nobody  5u IPv4 19882   0t0 UDP *:openvpn
openvpn 2151 root    5u IPv4 477262  0t0 UDP *:vpn0
openvpn 2156 root    5u IPv4 3206673 0t0 UDP *:vpn1
openvpn 2161 root    5u IPv4 2132802 0t0 UDP *:vpn2
openvpn 2165 root    5u IPv4 477350  0t0 UDP *:vpn3
openvpn 2170 root    5u IPv4 477362  0t0 UDP *:vpn4
... shows the established tunnels on the server
[root@vmd28527 Watcher]# lsof | grep vpn | grep TCP
Xvnc      1368      root 13u IPv4 3414493 0t0 TCP vpn1:vnc-1->vpn1c:37492 (ESTABLISHED)
llvmpipe- 1368 2079 root 13u IPv4 3414493 0t0 TCP vpn1:vnc-1->vpn1c:37492 (ESTABLISHED)
llvmpipe- 1368 2080 root 13u IPv4 3414493 0t0 TCP vpn1:vnc-1->vpn1c:37492 (ESTABLISHED)
... shows the TCP processes running across a tunnel.

Here:
- a tunneled VNC session #1
- running across tunnel #1
- established by vpn client 1 (as server process 37492)
Checking on the corresponding client ...
[root@hphws ~]# lsof | grep vpn | grep UDP
openvpn 2027 root 4u IPv4 38745 0t0 UDP *:vpn1

... openvpn client on tunnel #1
[root@hphws ~]# lsof | grep vpn | grep TCP
vncviewer 31988 comserve ... IPv4 ... TCP localhost:37492->vpn.comserve-it-services:5901 (ESTABLISHED)
vncviewer 31988 31989 ... IPv4 ... TCP localhost:37492->vpn.comserve-it-services:5901 (ESTABLISHED)
vncviewer 31988 31990 ... IPv4 ... TCP localhost:37492->vpn.comserve-it-services:5901 (ESTABLISHED)
vncviewer 31988 31991 ... IPv4 ... TCP localhost:37492->vpn.comserve-it-services:5901 (ESTABLISHED)
vncviewer 31988 31992 ... IPv4 ... TCP localhost:37492->vpn.comserve-it-services:5901 (ESTABLISHED)

... vncviewer session with server vpn.comserve-it-services on port 5901 for user 'comserve'(with 4 threads)
Where to go from here?
In this example, things were kept simple for clarity.
But going beyond all the restrictions in this example things can be worked out to tremendous sizes.
Giving up the simplicity in the network addressing the theoretical number of static tunnels can be increased to 256 tunnel sections with 127 configurable static tunnels which makes up a total of 32512 tunnels (theoretically). For such a range it turns out to be very hard to find enough space in the /etc/services file to label the exclusive port numbers. Not to speak of the new sizing of the underlying server hardware ...
Anyway. The concepts in the example hopefully showed how to fairly easily build up a VPN infrastructure with static/exclusive/dedicated/persistent VPN tunnels for use with 'home office' situations or 'local office servers' in small branches to connect with a central server.
Having questions?
If you have questions, ideas, wishes, success stories, or other thoughts, then drop us a message by using the contact form.
